# Javascript Essentials

<figure><img src="https://miro.medium.com/v2/resize:fit:875/1*e4h-Kj0TLvGnJFtUYeAprg.png" alt="" height="117" width="700"><figcaption></figcaption></figure>

Task 1\
Introduction

JavaScript (JS) is a popular scripting language that allows web developers to add interactive features to websites containing HTML and CSS (styling). Once the HTML elements are created, you can add interactiveness like validation, onClick actions, animations, etc, through JS. Learning the language is equally important as that of HTML and CSS. The JS scripts are used primarily with HTML.

This room is designed as an introductory overview of JS, specifically tailored for beginners with limited JS experience. The primary focus is on teaching the fundamentals of JS from a cyber perspective and how hackers utilise legitimate functionalities to achieve malicious results.

Room Prerequisites

Linux Fundamentals Module\
Web Application Basics\
How Websites Work

Learning Objectives

Understand the basics of JS\
Integrating JS in HTML\
Abusing Dialogue Function\
Bypassing Control Flow Statements\
Exploring Minified Files

Connecting to the Machine

You can start the virtual machine by clicking Start Machine. The machine will start in a split-screen view. If the VM is not visible, use the blue Show Split View button at the top-left of the page. Please wait 1–2 minutes after the system boots completely to let the auto scripts run successfully.

Note: All the scripts we create in this room are also available in the exercise folder on the Desktop of the attached VM, as shown below. If you find it difficult to create the scripts yourself, you can also use the provided ones.

desktop of attached VM

Let’s begin!

Task 2\
Essential Concepts

Variables

Variables are containers that allow you to store data values in them. Like any other language, variables in JS are similar to containers to store data. When you store something in a bucket, you also need to label it so that it can be referenced later on easily. Similarly, in JS, each variable has a name; when we store a certain value in a variable, we assign a name to it to reference it later. image of var, let and const typesThere are three ways to declare variables in JS: var, let, and const. While var is function-scoped, both let, and const are block-scoped, offering better control over variable visibility within specific code blocks.

Data Types

In JS, data types define the type of value a variable can hold. Examples include string (text), number, boolean (true/false), null, undefined, and object (for more complex data like arrays or objects).

Functions

A function represents a block of code designed to perform a specific task. Inside a function, you group code that needs to perform a similar task. For example, you are developing a web application in which you need to print students’ results on the web page. The ideal case would be to create a function PrintResult(rollNum) that would accept the roll number of the user as an argument.

```
<script>
 function PrintResult(rollNum) {
 alert("Username with roll number " + rollNum + " has passed the exam");
 // any other logic to display the result
 }
for (let i = 0; i < 100; i++) {
 PrintResult(rollNumbers[i]);
 }
 </script>
```

So, instead of writing the same print code for all the students, we will use a simple function to print the result.

Loops

Loops allow you to run a code block multiple times as long as a condition is true. Common loops in JS are for, while, and do…while, which are used to repeat tasks, like going through a list of items. For example, if we want to print the results of 100 students, we can call the PrintResult(rollNum) function 100 times by writing it 100 times, or we can create a loop that will be iterated through 1 to 100 and will call the PrintResult(rollNum) function as shown below.

```
// Function to print student result
 function PrintResult(rollNum) {
 alert("Username with roll number " + rollNum + " has passed the exam");
 // any other logic to the display result
 }
for (let i = 0; i < 100; i++) {
 PrintResult(rollNumbers[i]); // this will be called 100 times 
 }
```

Request-Response Cycle

In web development, the request-response cycle is when a user’s browser (the client) sends a request to a web server, and the server responds with the requested information. This could be a webpage, data, or other resources. You can learn more about it here.

<figure><img src="https://miro.medium.com/v2/resize:fit:708/1*UjwWpHQPERozsXdN4tVagg.png" alt="" height="92" width="566"><figcaption></figcaption></figure>

Task 3\
JavaScript Overview

In this task, we’ll use JS to create our first program. JS is an interpreted language, meaning the code is executed directly in the browser without prior compilation. Below is a sample JS code demonstrating key concepts, such as defining a variable, understanding data types, using control flow statements, and writing simple functions. These essential building blocks help create more dynamic and interactive web apps. Don’t worry if it looks a bit new now — we will discuss each of these concepts in detail later on.

```
// Hello, World! program
console.log("Hello, World!");
// Variable and Data Type
let age = 25; // Number type
// Control Flow Statement
if (age >= 18) {
 console.log("You are an adult.");
} else {
 console.log("You are a minor.");
}
// Function
function greet(name) {
 console.log("Hello, " + name + "!");
}
// Calling the function
greet("Bob");
```

JS is primarily executed on the client side, which makes it easy to inspect and interact with HTML directly within the browser. We’ll use the Google Chrome Console feature to run our first JS program, allowing us to write and execute JS code easily without additional tools. Follow these steps to get started:

Open Google Chrome by clicking the Google Chrome icon on the Desktop of the VM.

google chrome icon on the desktop of attached VM

Once Chrome is open, press Ctrl + Shift + I to open the Console or right-click anywhere on the page and select Inspect.

<figure><img src="https://miro.medium.com/v2/resize:fit:875/1*StYILJJ243VrklbIy1BZhw.png" alt="" height="374" width="700"><figcaption></figcaption></figure>

how to click inspect element in Chrome

Then, click on the Console tab. This console allows you to run JS code directly in the browser without installing additional software.

<figure><img src="https://miro.medium.com/v2/resize:fit:875/1*kVqdo0zCefSsHFRW79AP2A.png" alt="" height="123" width="700"><figcaption></figcaption></figure>

Console option in Chrome

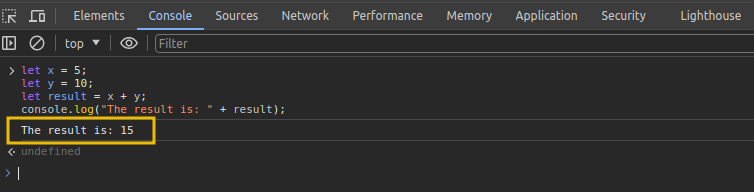
Let’s create a simple JS program that adds two numbers and displays the result. Below is the code:

```
let x = 5;
let y = 10;
let result = x + y;
console.log("The result is: " + result);
```

In the code above, x and y are variables holding the numbers. x + y is an expression that adds the two numbers together, whereas console.log is a function used to print the result to the console.\
Copy the above code and paste it into the console by pressing the key Ctrl + V. Once pasted, press Enter. You should see the result displayed as:

<figure><img src="https://miro.medium.com/v2/resize:fit:875/1*IfwsWdz4eV2shrdAGyDMxg.png" alt="" height="179" width="700"><figcaption></figcaption></figure>

result of hello world program in Chrome Console

Congratulations! You’ve successfully created your first program in JS. This is just the beginning, and there’s much more to explore as we dive deeper into JS in this room.

<figure><img src="https://miro.medium.com/v2/resize:fit:499/1*h62SUz897J4Dl6txsLgVGw.png" alt="" height="209" width="399"><figcaption></figcaption></figure>

**Task 4**\
**Integrating JavaScript in HTML**

This task assumes you have a basic understanding of HTML and its structure. This section will explore how JS can be integrated into HTML. Usually, JS is not used to render content; it works with HTML and CSS to create dynamic and interactive web pages. If you’re unfamiliar with HTML, reviewing it through the provided link is recommended. There are two main ways to integrate JS into HTML: internally and externally.

Internal JavaScript

Internal JS refers to embedding the JS code directly within an HTML document. This method is preferable for beginners because it allows them to see how the script interacts with the HTML. The script is inserted between \<script> tags. These tags can be placed inside the \<head> section, typically used for scripts that need to be loaded before the page content is rendered, or inside the \<body> section, where the script can be utilised to interact with elements as they are loaded on the web page.

Example

To create an HTML document with internal JS, right-click on the Desktop and select Create Document > Empty File. Name the file internal.html. Next, right-click the internal.html file and choose Open with Pluma to open it in a text editor.

<figure><img src="https://miro.medium.com/v2/resize:fit:804/1*SdeMMrNhc7RtVVze4zm28Q.png" alt="" height="778" width="643"><figcaption></figcaption></figure>

instruction to open Pluma notepad

Once the editor is open, paste the following code:

```
<!DOCTYPE html>
<html lang="en">
<head>
 <title>Internal JS</title>
</head>
<body>
 <h1>Addition of Two Numbers</h1>
 <p id="result"></p>
<script>
 let x = 5;
 let y = 10;
 let result = x + y;
 document.getElementById("result").innerHTML = "The result is: " + result;
 </script>
</body>
</html>
```

After pasting the code, click File and select Save, which will save the file to internal.html.Double-click the file to open it in Chrome browser, where you will see the following output:

<figure><img src="https://miro.medium.com/v2/resize:fit:564/1*ZKbgB5nVLoPDXKMM8pwafg.png" alt="" height="266" width="451"><figcaption></figcaption></figure>

Internal.html output in Chrome

In this HTML document, we are using internal JS, meaning the code is placed directly inside the HTML file within the \<script> tag. The script performs a simple task: it adds two numbers (x and y) and then displays the result on the web page. The JS interacts with the HTML by selecting an element (\<p> with id=”result”) and updating its content using *document.getElementById(“result”).innerHTML*. This internal JS is executed when the browser loads the HTML file.

External JavaScript

External JS involves creating and storing JS code in a separate file ending with a **.js** file extension. This method helps developers keep the HTML document clean and organised. The external JS file can be stored or hosted on the same web server as the HTML document or stored on an external web server such as the cloud.

We will use the same example for external JS but separate the JS code into a different file.

First, create a new file named script.js and save it on the Desktop with the following code:

let x = 5;\
let y = 10;\
let result = x + y;\
document.getElementById(“result”).innerHTML = “The result is: “ + result;

Next, create a new file named external.html and paste the following code (notice that the HTML code is the same as that of the previous example):

```
<!DOCTYPE html>
<html lang="en">
<head>
 <meta charset="UTF-8">
 <meta name="viewport" content="width=device-width, initial-scale=1.0">
 <title>External JS</title>
</head>
<body>
 <h1>Addition of Two Numbers</h1>
 <p id="result"></p>
<! - Link to the external JS file →
 <script src="script.js"></script>
</body>
</html>
```

Now, double-click the external.html file and check the results. Do you see any difference? No, the output remains the same as in the previous example.

<figure><img src="https://miro.medium.com/v2/resize:fit:621/1*U4lU8HPpYAS_4Cti1d4lVQ.png" alt="" height="271" width="497"><figcaption></figcaption></figure>

external.html output in chrome

What we did differently is use the **src** attribute in the \<script> tag to load the JS from an external file. When the browser loads the page, it looks for the script.js file and loads its content into the HTML document. This approach allows us to keep the JS code separate from the HTML, making the code more organised and easier to maintain, especially when working on larger projects.

Verifying Internal or External JS

When pen-testing a web application, it is important to check whether the website uses internal or external JS. This can be easily verified by viewing the page’s source code. To do this, open the page **external\_test.html** located in the exercise folder in Chrome, right-click anywhere on the page, and select View Page Source.

<figure><img src="https://miro.medium.com/v2/resize:fit:823/1*XePAdSO3gE4Vi88Op6j_tg.png" alt="" height="679" width="658"><figcaption></figcaption></figure>

how to view page source in Chrome

This will display the HTML code of the rendered page. Inside the source code, any JS written directly on the page will appear between \<script> tags without the **src attribute**. If you see a \<script> tag with a src attribute, it indicates that the page is loading external JS from a separate file.

<figure><img src="https://miro.medium.com/v2/resize:fit:820/1*2U4dWSdZ86DPiIBd8ZRCbQ.png" alt="" height="421" width="656"><figcaption></figcaption></figure>

how to view external JS in chrome

For a practical example, visit [https://tryhackme.com](https://tryhackme.com/) in your browser and inspect the source code to identify how the website loads the JS internally and from external sources.

<figure><img src="https://miro.medium.com/v2/resize:fit:875/1*EnhYt8R7l3fJ4QsyC093qQ.png" alt="" height="277" width="700"><figcaption></figcaption></figure>

how to view page source of a website

<figure><img src="https://miro.medium.com/v2/resize:fit:768/1*nkRyS4tkqUgj00bj4baVoQ.png" alt="" height="411" width="614"><figcaption></figcaption></figure>

**Task 5**\
**Abusing Dialogue Functions** <a href="#id-65c3" id="id-65c3"></a>
-------------------------------------------------------------------

One of the main objectives of JS is to provide dialogue boxes for interaction with users and dynamically update content on web pages. JS provides built-in functions like alert, prompt, and confirm to facilitate this interaction. These functions allow developers to display messages, gather input, and obtain user confirmation. However, if not implemented securely, attackers may exploit these features to execute attacks like Cross-Site Scripting (XSS), which you will cover later in this module.

We will be using the Google Chrome console in the upcoming exercises.

### Alert <a href="#d6e9" id="d6e9"></a>

The alert function displays a message in a dialogue box with an “OK” button, typically used to convey information or warnings to users. For example, if we want to display “Hello THM” to the user, we would use an alert(“HelloTHM”);. To try it out, open the Chrome console, type alert(“Hello THM”), and press Enter. A dialogue box with the message will appear on the screen.

<figure><img src="https://miro.medium.com/v2/resize:fit:875/1*7FQgaxHAlR2_WRIq_JZ77Q.png" alt="" height="375" width="700"><figcaption></figcaption></figure>

### Prompt <a href="#id-4b5d" id="id-4b5d"></a>

The prompt function displays a dialogue box that asks the user for input. It returns the entered value when the user clicks “OK”, or null if the user clicks “Cancel”. For example, to ask the user for their name, we would use prompt(“What is your name?”);.

To test this, open the Chrome console and paste the following that asks for a username and then greets him.

```
name = prompt("What is your name?");
    alert("Hello " + name);
```

Once you paste the code and hit Enter, a dialogue box will appear, and the value entered by the user will be returned to the console.

<figure><img src="https://miro.medium.com/v2/resize:fit:875/1*xx00ogN6akEGrC20ONwlpQ.png" alt="" height="384" width="700"><figcaption></figcaption></figure>

### **Confirm** <a href="#id-2981" id="id-2981"></a>

The *confirm function* displays a dialogue box with a message and two buttons: “OK” and “Cancel”. It returns true if the user clicks “OK” and false if the user clicks “Cancel”. For example, to ask the user for confirmation, we would use confirm(“Are you sure?”);. To try this out, open the Chrome console, type confirm(“Do you want to proceed?”), and press Enter.

<figure><img src="https://miro.medium.com/v2/resize:fit:875/1*_94EMkCl8bYnGd4C_Y4jIA.png" alt="" height="377" width="700"><figcaption></figcaption></figure>

A dialogue box will appear, and depending on whether the user clicks “OK” or “Cancel”, the value true or false will be returned to the console.

<figure><img src="https://miro.medium.com/v2/resize:fit:875/1*1hVXxbidi0kV6xvOkE2x2Q.png" alt="" height="218" width="700"><figcaption></figcaption></figure>

How Hackers Exploit the Functionality

Imagine receiving an email from a stranger with an attached HTML file. The file looks harmless, but when you open it, it contains JS that disrupts your browsing experience. For example, the following code will show an alert box with the message “Hacked” three times:

```


<!DOCTYPE html>
<html lang="en">
<head>
    <title>Hacked</title>
</head>
<body>
    <script>
        for (let i = 0; i < 3; i++) {
            alert("Hacked");
        }
    </script>
</body>
</html>
```

On the Desktop of the attached VM, create a file called invoice.html and paste the above code. Double-click the file to open it, and the alert message will pop up three times, causing an undesired experience.

<figure><img src="https://miro.medium.com/v2/resize:fit:875/1*1hVXxbidi0kV6xvOkE2x2Q.png" alt="" height="218" width="700"><figcaption></figcaption></figure>

Imagine if a bad actor sent you a similar file, but instead of displaying the alert three times, the number is set to 500. You would be forced to keep closing the alert boxes one after another. This is a simple example of how malicious JS can be used to create an inconvenience or worse. Therefore, ensuring you only execute JS files from trusted sources is crucial to avoid such an undesired experience.

<figure><img src="https://miro.medium.com/v2/resize:fit:875/1*v6sKLV4HggNXZxDOjXNB1g.png" alt="" height="268" width="700"><figcaption></figcaption></figure>

Task 6\
Bypassing Control Flow Statements <a href="#id-39b7" id="id-39b7"></a>
----------------------------------------------------------------------

Control flow in JS refers to the order in which statements and code blocks are executed based on certain conditions. JS provides several control flow structures such as if-else, switch statements to make decisions, and loops like for, while, and do…while to repeat actions. Proper use of control flow ensures that a program can handle various conditions effectively.

Conditional Statements in Action

One of the most used conditional statements is the if-else statements, which allows you to execute different blocks of code depending on whether a condition evaluates to true or false.

To test this practically, let’s create a file age.html on the Desktop of the attached VM and paste the following code:

```


<!DOCTYPE html>
<html lang="en">
<head>
    <title>Age Verification</title>
</head>
<body>
    <h1>Age Verification</h1>
    <p id="message"></p>

    <script>
        age = prompt("What is your age")
        if (age >= 18) {
            document.getElementById("message").innerHTML = "You are an adult.";
        } else {
            document.getElementById("message").innerHTML = "You are a minor.";
        }
    </script>
</body>
</html>
```

Double-click the file to open it in Google Chrome. You will see the following image:

<figure><img src="https://miro.medium.com/v2/resize:fit:875/1*ARHU6SbgnWrzzf4vYLpI6w.png" alt="" height="194" width="700"><figcaption></figcaption></figure>

In the above code, a prompt will ask for your age. If your age is greater than or equal to 18, it will display a message saying, “You are an adult.” Otherwise, it will show a different message. This behaviour is controlled by the if-else statement, which checks the value of the age variable and displays the appropriate message based on the condition.

### Bypassing Login Forms <a href="#d2eb" id="d2eb"></a>

Suppose a developer has implemented authentication functionality in JS, where only users with the username “admin” and passwords matching a specific value are allowed to log in. To see this in action, open the login.html file in the exercises folder.

<figure><img src="https://miro.medium.com/v2/resize:fit:875/1*ewq1bVd1N-WYaC8xDnHk7g.png" alt="" height="319" width="700"><figcaption></figcaption></figure>

When you double-click the file and open it in your browser, it will prompt you for a username and password. If the correct credentials are entered, it will display a message confirming that you are logged in, as shown below:

<figure><img src="https://miro.medium.com/v2/resize:fit:723/1*adcpoTv_me1RmvpT3vOGHA.png" alt="" height="286" width="578"><figcaption></figcaption></figure>

<figure><img src="https://miro.medium.com/v2/resize:fit:603/1*5x7R9_6_akNBOTNcqGDp9Q.png" alt="" height="207" width="482"><figcaption></figcaption></figure>

Task 7\
Exploring Minified Files <a href="#id-5cb8" id="id-5cb8"></a>
-------------------------------------------------------------

We have understood how JS works and how we can read it until now, but what if the file is not human-readable and has been minified?

Minification in JS is the process of compressing JS files by removing all unnecessary characters, such as spaces, line breaks, comments, and even shortening variable names. This helps reduce the file size and improves the loading time of web pages, especially in production environments. Minified files make the code more compact and harder to read for humans, but they still function exactly the same.

Similarly, obfuscation is often used to make JS harder to understand by adding undesired code, renaming variables and functions to meaningless names, and even inserting dummy code.

Practical Example

Create a file on the Desktop of the attached VM with the name hello.html and paste the following HTML code:

```
<!DOCTYPE html>
<html lang="en">
<head>
    <title>Obfuscated JS Code</title>
</head>
<body>
    <h1>Obfuscated JS Code</h1>
    <script src="hello.js"></script>
</body>
</html>
```

Then, create another file with the name hello.js and add the following code:

```


function hi() {
  alert("Welcome to THM");
}
hi();
```

Now, double-click the hello.html file to open it in Google Chrome. Once the file is opened, you will see an alert greeting you with “Welcome to THM”.

<figure><img src="https://miro.medium.com/v2/resize:fit:875/1*1t-0EGSIPXjyQ1OZCQPRDw.png" alt="" height="161" width="700"><figcaption></figcaption></figure>

Click OK to close the alert dialogue box. Right-click anywhere on the page and click on Inspect to open the developer tools. In the developer tools, navigate to the Sources tab and click on the hello.js file to view the source code. You will see that the JS code is easily accessible and viewable, as shown below:

<figure><img src="https://miro.medium.com/v2/resize:fit:875/1*YRLKoQZtoiGEl4kw8yWH_A.png" alt="" height="421" width="700"><figcaption></figcaption></figure>

Obfuscation in Action

Now, we will try to minify and obfuscate the JS code using an online tool. Visit the website and copy the contents of hello.js, and paste them into the dialogue box on the website. The tool will minify and obfuscate the code, turning it into a string of gibberish characters shown below:

<figure><img src="https://miro.medium.com/v2/resize:fit:875/1*twmOQbyEIkrKx8YDlGY70Q.png" alt="" height="308" width="700"><figcaption></figcaption></figure>

But what if we tell you that these gibberish characters are still fully functional code? The only difference is that they are not human-readable, but the browser can still execute them correctly. The website converted our JS code to this one:

```
(function(_0x114713,_0x2246f2){var _0x51a830=_0x33bf,_0x4ce60b=_0x114713();while(!![]){try
{var _0x51ecd3=-parseInt(_0x51a830(0x88))/(-0x1bd3+-0x9a+0x2*0xe37)*(parseInt(_0x51a830(0x94))/
(-0x15c1+-0x2*-0x3b3+0xe5d))+parseInt(_0x51a830(0x8d))/(0x961*0x1+0x2*0x4cb+0x4bd*-0x4)*
(-parseInt(_0x51a830(0x97))/(-0x22b3+0x16e9+0x1*0xbce))+parseInt(_0x51a830(0x89))/
(-0x631+0x20cd+0x8dd*-0x3)*(-parseInt(_0x51a830(0x95))/(-0x8fc+0x161+0x7a1))+-
parseInt(_0x51a830(0x93))/(-0x1c38+0x193+0x1aac)*(parseInt(_0x51a830(0x8e))/
(-0x1*-0x17a6+-0x167e+-0x3*0x60))+-parseInt(_0x51a830(0x91))/(-0x2*-0x1362+-0x4a8*0x5+-0xf73)*
(parseInt(_0x51a830(0x8b))/(-0xb31*0x2+0x493*0x5+0x1*-0x73))+parseInt(_0x51a830(0x8f))/
(-0x257a+-0x1752+0x3cd7)+parseInt(_0x51a830(0x90))/(-0x2244+-0x15f9+0x3849);if(_0x51ecd3
===_0x2246f2)break;else _0x4ce60b['push'](_0x4ce60b['shift']());}catch(_0x38d15c)
{_0x4ce60b['push'](_0x4ce60b['shift']());}}}(_0x11ed,-0x17d11*-0x1+0x2*0x2e27+0x100f*0x17));
function hi(){var _0x48257e=_0x33bf,_0xab1127={'xMVHQ':function(_0x4eefa0,_0x4e5f74)
{return _0x4eefa0(_0x4e5f74);},'FvtWc':_0x48257e(0x96)+_0x48257e(0x92)};_0xab1127[_0x48257e(0x8c)
](alert,_0xab1127[_0x48257e(0x8a)]);}function _0x33bf(_0xb07259,_0x5949fe){var _0x3a386b
=_0x11ed();return _0x33bf=function(_0x4348ee,_0x1bbf73){_0x4348ee=_0x4348ee-(0x11f7+-
0x1*0x680+-0x3a5*0x3);var _0x423ccd=_0x3a386b[_0x4348ee];return _0x423ccd;},_0x33bf
(_0xb07259,_0x5949fe);}function _0x11ed(){var _0x4c8fa8=['7407EbJESQ','\x20THM',
'2700698TTmqXC','10ILFtfZ','190500QONgph','Welcome\x20to',
'4492QOmepo','21623eEAyaP','65XMlsxw','FvtWc','2410qfnGAy','xMVHQ','321PfYXZg',
'8XBaIAe','1946483GviJfa','15167592PYYhTN'];_0x11ed=function(){return _0x4c8fa8;};return _0x11ed();}hi();
```

Click the Copy to Clipboard (highlighted as 2 in the above image) button as shown on the website. Then, remove the current content of hello.js on the attached VM and paste the obfuscated content into the file.

Reload the hello.html file in Google Chrome and inspect the source code again under the Sources tab. You will notice that the code is now obfuscated but still functions exactly the same as before.

<figure><img src="https://miro.medium.com/v2/resize:fit:1250/1*re5EzlA2IkCXGwgFclADwA.png" alt="" height="517" width="1000"><figcaption></figcaption></figure>

Deobfuscating a Code

We can also deobfuscate an obfuscated code using an online tool. Visit the website, then paste the obfuscated code into the provided dialogue box. The website will generate the equivalent, human-readable JS code for you, making it easier to understand and analyze the original script.

<figure><img src="https://miro.medium.com/v2/resize:fit:1250/1*7545cOVAZUuT8goFR5Syhg.png" alt="" height="439" width="1000"><figcaption></figcaption></figure>

You have seen how easily we deobfuscated and retrieved our original code.

<figure><img src="https://miro.medium.com/v2/resize:fit:681/1*StEX-CB2dq2QNllda8anPg.png" alt="" height="256" width="545"><figcaption></figcaption></figure>


---

# Agent Instructions: Querying This Documentation

If you need additional information that is not directly available in this page, you can query the documentation dynamically by asking a question.

Perform an HTTP GET request on the current page URL with the `ask` query parameter:

```
GET https://foothold.gitbook.io/blog/javascript-essentials.md?ask=<question>
```

The question should be specific, self-contained, and written in natural language.
The response will contain a direct answer to the question and relevant excerpts and sources from the documentation.

Use this mechanism when the answer is not explicitly present in the current page, you need clarification or additional context, or you want to retrieve related documentation sections.
