# Walkthrough Level 0 to 34
## **Level 0 → Level 1**
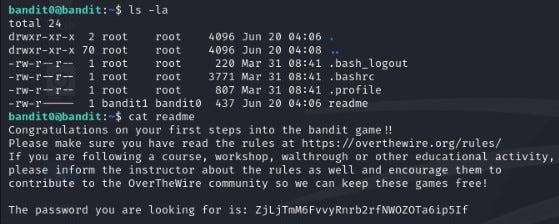
ls -la command is the terminal command used in Kali Linux or other Linux distributions.
* ls: This command is abbreviation of the word “list” and shows the files and directories in the current section.
* -l: Provides detailed information about the file. It includes permissions, file owner, group, file size, creation date, and the name of each file or directory
* -a: This argument displays all files, including hidden files (those starting with ‘.’).
## Level 1 → Level 2
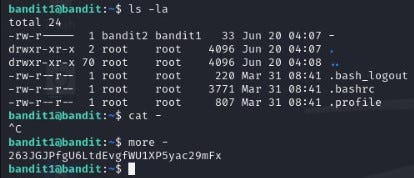
Here we have a file that cannot be read with the ‘cat’ command. We’ll try the ‘more’ command. You can read more details through the [**link**](https://www.liquidweb.com/blog/how-to-display-contents-of-a-file-linux/).
## Level 2 → Level 3
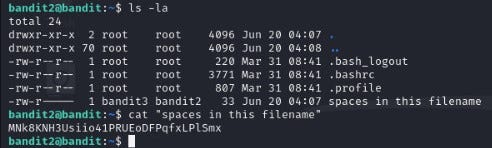
Here we encounter an error when typing “cat spaces in this filename”. Therefore, we can read the file using the ‘more’ command, referring to the article from the [**link**](https://superuser.com/questions/606874/cannot-cat-file-which-has-space-in-name-in-linux).
## Level 3 → Level 4
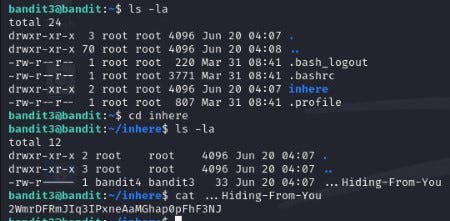
As mentioned in the first level, it is possible to see hidden directories with the command “ls -la”.
## Level 4 → Level 5
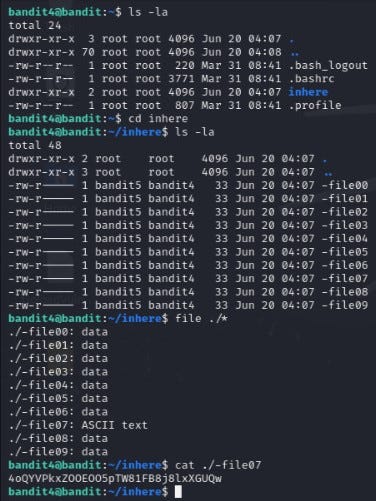
In this round, we are told that the file is formatted in a way that can be read by humans. However, due to the large number of files, determining their type rather than opening each one individually is a quicker solution.
The [`file`](https://medium.com/r?url=https%3A%2F%2Fwww.hostinger.in%2Ftutorials%2Flinux-file-command%2F)[ ](https://medium.com/r?url=https%3A%2F%2Fwww.hostinger.in%2Ftutorials%2Flinux-file-command%2F)command is used in Unix/Linux systems to determine the type of files.
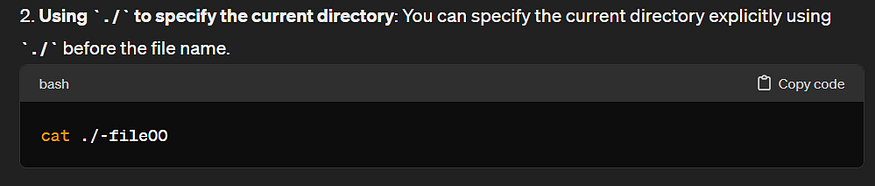
* “.” (dot) represents the current directory. It is used when specifying a file path.
* “/” represents all files in the current directory. For example, to represent files in a subdirectory two levels deep, you would use “/\*/\*”.
When typing “cat -file07,” we’ll get an error, so we should write it in the following format (./ indicates the current directory).
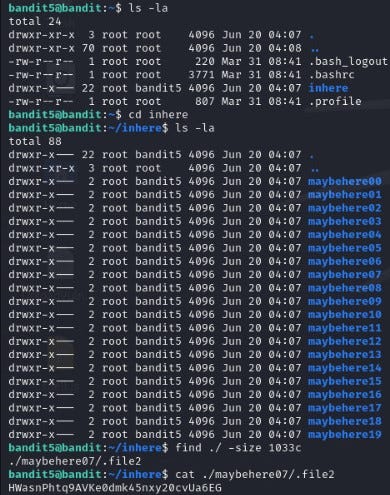
### Level 5 → Level 6
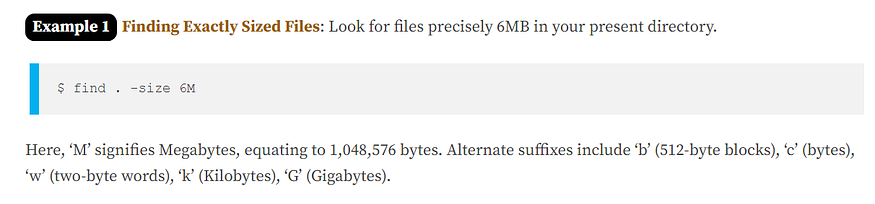
In this level, we are informed that the file size is 1033 bytes. Therefore, we search in the following format. You can read more about the [**`find`**](https://www.tecmint.com/35-practical-examples-of-linux-find-command/)[ ](https://www.tecmint.com/35-practical-examples-of-linux-find-command/)command from the link.
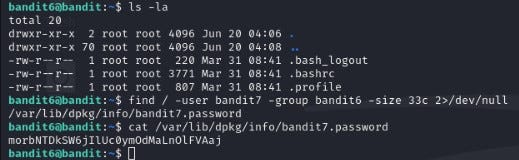
### Level 6 → Level 7
In this level, we are told that the searched file’s owner is bandit7, group is bandit06, and size is 33 bytes. We already learned how to search for files based on size in a previous level. Now, let’s learn how to search based on owner and group according to the article from the [**link**](https://unix.stackexchange.com/questions/22747/finding-files-by-their-owner-and-file-permissions/).
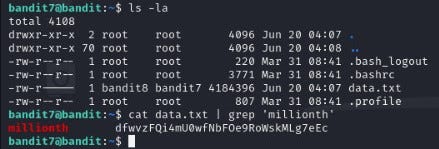
### Level 7 → Level 8
In this level, we are told that the password is next to the word “millionth” inside data.txt. However, we notice that directly reading the file to find this is time-consuming. Therefore, we use the following command:
cat data.txt ┃grep ‘millionth’
* Here, as we know, `cat data.txt` reads the contents of the file.
* The “|” (pipe symbol) takes the output of the first command and passes it as input to the second command. You can find more detailed information in the [link](https://www.redhat.com/sysadmin/pipes-command-line-linux).
* The “grep” command extracts lines from a file that match a specified word or pattern. In this context, since the word is associated with “password,” grep provided results. In other cases, you can use grep with arguments as explained in the [**link**](https://www.geeksforgeeks.org/grep-command-in-unixlinux/).
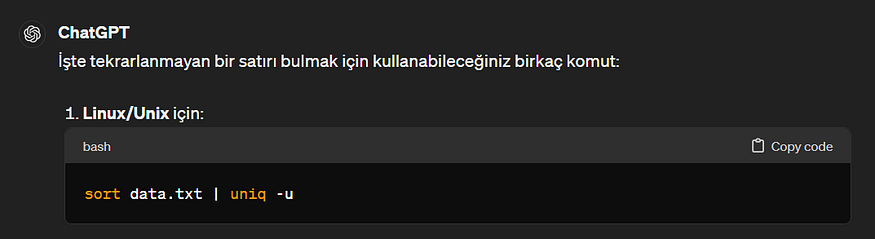
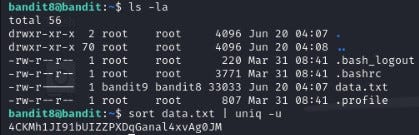
### Level 8 → Level 9
In this level, as a hint, we are told that the password is in the line of data.txt that does not repeat. Additionally, although there are sorting algorithms, it is possible to solve the problem with just two Linux commands :)
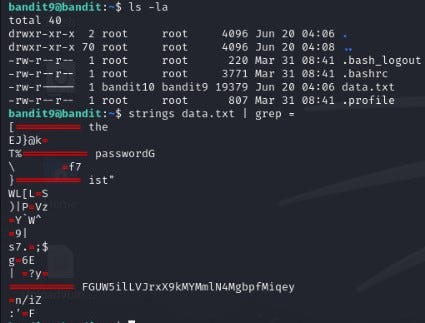
### Level 9 → Level 10
In this level, as a hint, it’s mentioned that the password for the next level is stored in one of the lines that can be read by several people in the data.txt file, preceded by several ‘=’ symbols. Initially, when we directly read the file, we see unreadable characters like “��̃�q���Y�\_�C�G�b�g”. Therefore, first, to extract readable parts, we use the command “strings data.txt”. You can find more information about the strings command from the [**link**](https://www.howtogeek.com/427805/how-to-use-the-strings-command-on-linux/). Then, we pass this result as input to the “grep” command using the “|” (pipe symbol) as mentioned in the hint, to retrieve parts containing the ‘=’ symbol:
### Level 10 → Level 11
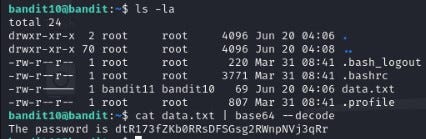
In this level, we are told that the password is stored in the data.txt file encoded in base64. It remains for us to decode it ☕
### Level 11 → Level 12
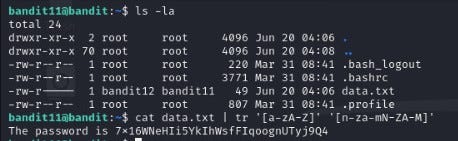
We are told that the letters have shifted by 13 positions. Searching “Rotating 13 symbols” on the internet brings up articles about “ROT13”. Later, when searching for ROT13 decode, we come across the command `tr '[a-zA-Z]' '[n-za-mN-ZA-M]'`.
`[a-zA-Z]`: Represents all lowercase letters from ‘a’ to ‘z’ and uppercase letters from ‘A’ to ‘Z’. `[n-za-mN-ZA-M]`: Represents the letters to which each letter will be shifted. Here, each letter’s Unicode code (ASCII) is shifted by 13 positions. For more detailed information, you can follow the [**link**](https://askubuntu.com/questions/1085069/how-can-i-decode-a-file-where-each-letter-has-been-replaced-with-the-letter-13-l).
### Level 12 → Level 13
Here, we are told that the data.txt file is a repeatedly compressed hexdump file. It is recommended to create a directory in /tmp and work there. Since the file is repeatedly compressed as a hexdump, we use reverse algorithms. While we could solve this stage by writing a script, we chose this approach to practice using commands.
xxd -r data.txt data.out
* xxd: Hexdump is a command that performs hexadecimal dump operations.
* -r:”Reverse” means to do the opposite or to undo something. In this context, it refers to converting a hexadecimal (hex) dump file back into a regular file format.
* data.txt: The input file’s name. This file should be in hexdump format.
* data.out: The output file’s name.
At each stage, we use the `file` command to determine the type of the resulting file, which helps us identify which operation to reverse.
If the result of the `file` command is "gzip compressed data," it means the file is compressed in gzip format. In such a case, we use the `mv` command to rename `data.out` to `data.gz` because we need to reverse this file format.
gzip -d data.gz
* gzip: This is a program used for compressing and decompressing files.
* -d: “Dekompress” means to decompress, and it is used to open or extract files.
* data.gz: The name of the file to be opened. This file is compressed in gzip format.
Other commands in sequence proceed in this format. The compression method of the file is identified, reversed, and then the file is opened. As a result, an ASCII text file is obtained.
### Level 13 → Level 14
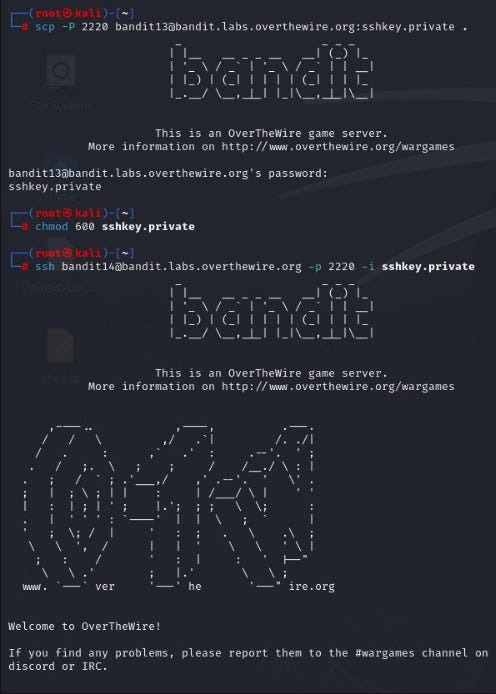
In this round, we are told that the password for the next level is located in the directory `/etc/bandit_pass/bandit14`, but it can only be read by the user bandit14. Instead of a password, we are given an SSH key to proceed to the next stage. Note: localhost refers to the machine we are working on (in our case, the Kali Linux machine).
First, because the file we’re working with is an SSH key, we need to securely download it instead of copying it to our local machine, as it raises security concerns when used directly.
scp -P 2220 :sshkey.private .
* `scp`,”Secure Copy Protocol” (SCP) is an abbreviation used to securely copy documents from one system to another.
* `-P 2220`: It indicates that SSH will connect over port 2220.
* `bandit13@bandit.labs.overthewire.org:sshkey.private`: This part indicates that the user bandit13 wants to retrieve the file named sshkey.private from the server named bandit.labs.overthewire.org.
* `.`: This point indicates that the document will be copied to our current directory.
Later, we change the permissions of that SSH key to 600. This means read and write permissions are granted: `chmod 600`
ssh -p 2220 -i sshkey.private
* `ssh`: It’s a command to connect to a remote system using the SSH protocol.
* `bandit14@bandit.labs.overthewire.org`: This part indicates that the user bandit14 will connect to the server named bandit.labs.overthewire.org.
* `-p 2220`: It indicates that the SSH connection will be made over port 2220.
* `-i sshkey.private`: Here, `-i` is used to specify the SSH key for identification.
After successfully connecting with SSH, as mentioned at the beginning of the level, we read `/etc/bandit_pass/bandit14` and obtain the password.
### Level 14 → Level 15
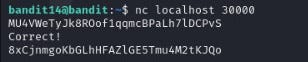
Here, it tells us to connect to localhost on port 30000 and submit the password we found, and then we’ll receive the password for the next level. In this case, we need to connect using either telnet or netcat and enter the password.
### Level 15 → Level 16
In this level, we are tasked with confirming the password we find on localhost’s port 30001. However, this time, we need to connect using SSL encryption. To achieve this, we use the `openssl` command. For detailed information, refer to the [**link**](https://community.tenable.com/s/article/Using-OpenSSL-to-verify-certificate-information-on-a-port?language=en_US).
*openssl s\_client -connect localhost:30001*
### Level 16 → Level 17
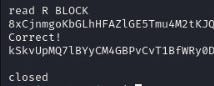
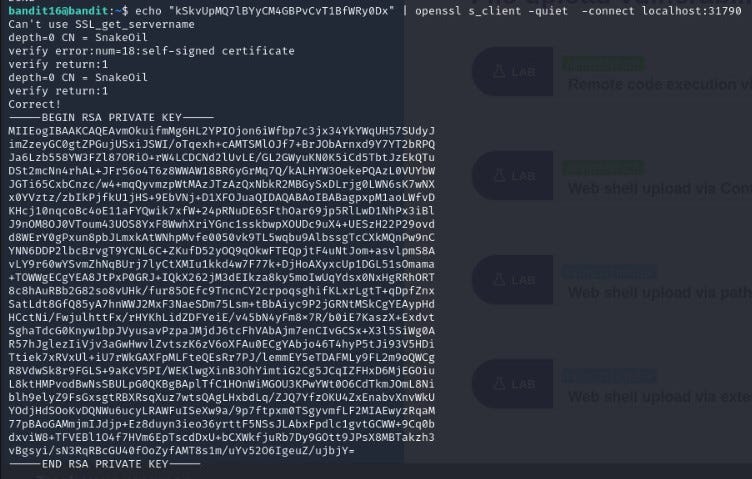
In this round, we are tasked with first identifying which port is up within the range of 31000 to 32000 on localhost. Then, we need to determine which of these ports are using SSL encryption. This requires individually testing the ports using openssl connection. (I’ve directly provided the result to avoid confusion since I’ve already checked.)
Later, we pass the password for bandit16 through port 31790 using the `echo` command, and then we obtain the SSH key.
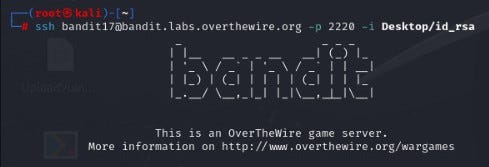
### Level 17 → Level 18
First, we connect to bandit17 using the `id_rsa` key we found in the previous level, and then we obtain the password for bandit17.
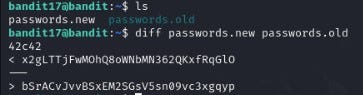
In this round, we’re informed that one of the lines in the files `passwords.new` and `passwords.old` has been modified, and that modified line contains the password. To compare these files, we use the `diff` tool. The line above is the password:
### Level 18 → Level 19
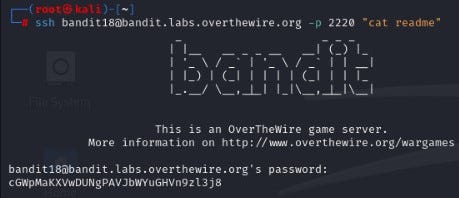
SSH login attempts are automatically terminated with a “Bye Bye” message because of a configuration in `.bashrc`. Additionally, we are informed that the password is in the readme file. In fact, there are several ways to solve this level, such as modifying the `.bashrc` file and so on. However, the simplest way is to issue a command directly without logging in via SSH. For detailed information, you can find it at the link provided.
### Level 19 → Level 20
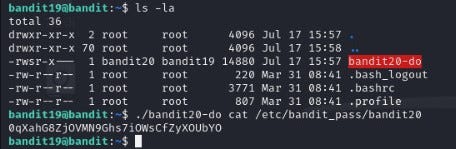
SUID (Set User ID) permission allows a file to be executed with the privileges of the file’s owner rather than the user who is executing it. For more detailed information, you can obtain it from the provided [link](https://medium.com/@rzashirinov38/linux-fayl-icaz%C9%99l%C9%99ri-x%C3%BCsusi-icaz%C9%99l%C9%99r-29e9e257c02d).
### Level 20 → Level 21
Here, the SUID file is explained as follows: it connects to the specified port on localhost, reads the lines written to that port, and compares them with the password of bandit20. If correct, it provides the password for bandit21. To achieve this, we simply need to dedicate one terminal window to listening and the other to executing the SUID file.
### Level 21 → Level 22
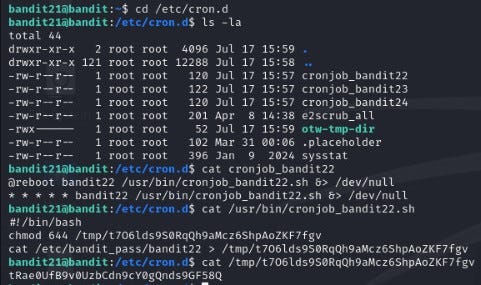
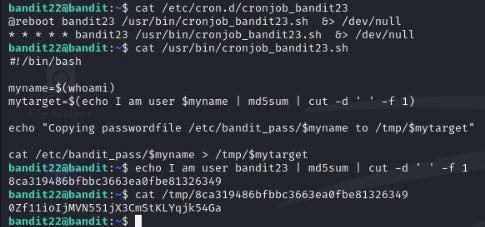
In this level, we are tasked with finding out which command is scheduled to run at regular intervals in the `/etc/cron.d/` directory. When we list the contents of this directory using `ls -la`, we see the file for the next round, bandit22. Upon reading this file, we are directed to `/usr/bin/cronjob_bandit22.sh`. When we read that file, it shows us a directory under `/tmp`. The directory name resembles a password but isn't actually the password itself. Afterwards, we need to read that file. For information about cron, you can read from the article provided in the [**link**](https://opensource.com/article/17/11/how-use-cron-linux).
### Level 22 → Level 23
Here, you simply need to read the script and find out where the password is located. Initially, in the script, the ‘**myname**’ variable is assigned the value ‘bandit23’. Then, instead of ‘**myname**’, we write ‘bandit23’ into the ‘**mytarget**’ variable in the code as it is in the terminal. At this point, this line of code will first convert our input into our writing into md5 hash format, then it will take the first word with the cut command and write it to the screen (in backstage, will have mytarget). In the next piece of code, the **/etc/bandit\_pass/bandit23** will be held to **/tmp/$mytarget**. When we read that file in the .tmp, we will have found the next password
### Level 23 → Level 24
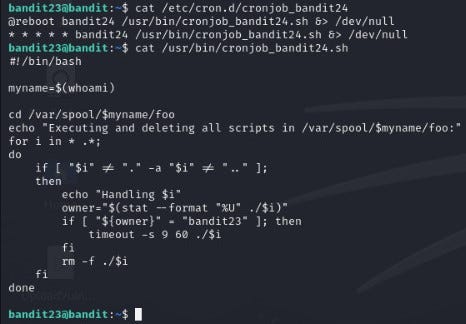
We obtain the script advancing in this level as we did in the previous level.
The algorithm for executing the script is in this form:
1. The command `whoami` assigns the user name to the variable `myname`.
2. Then it changes to the directory `/var/spool/$myname/foo` using the command `cd`.
3. A loop begins to traverse all files and directories inside the directory(`for i in * .*; do)`
4. For each file/directory, this algorithm is followed:
a. If the file/directory is not `.`or `..`, meaning it’s not the current directory or the parent directory, the process begins.
b. Assign the owner of the file to the `owner` variable (using the command `stat --format "%U" ./$i`).
c. If the owner of the file is ‘bandit23’, execute the file within a timeout of 60 seconds (`timeout -s 9 60 ./$i`)
d. Delete the file (`rm -f ./$i`).
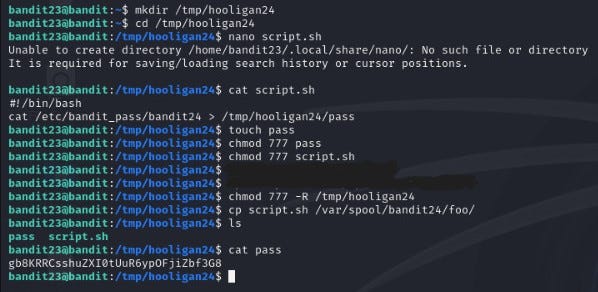
We need to copy this operation if it hasn’t finished (if the password hasn’t been deleted). For this, we create our directory in the tmp directory, then write our script:
```
#!/bin/bash
cat /etc/bandit_pass/bandit24 > /tmp/hooligan24/pass
```
The script reads the file /etc/bandit\_pass/bandit24 and copies it to /tmp/hooligan24/pass. Then, it sets all permissions (chmod 777) for the script file where the password will be written, the pass file, and the /tmp/hooligan24 directory to avoid any issues during execution. Afterwards, the script moves our script file to the directory /var/spool/bandit24/foo as specified. After 60 seconds, the password will be in the file we specified.
## Level 24 → Level 25
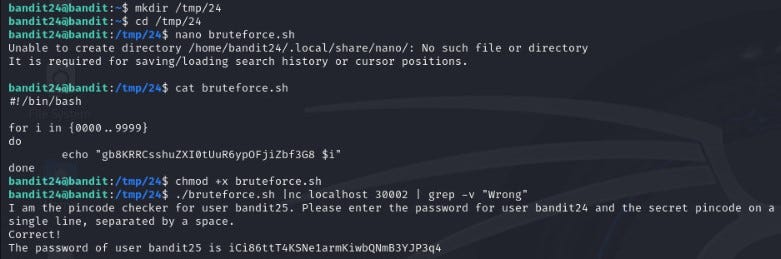
In this level, it is said that we can obtain the password for bandit25 by providing the password for bandit24 and a 4-digit PIN code to localhost on port 30002. Additionally, it’s noted that understanding how the system works and seeing error messages involves first manually attempting brute-force methods.
You should write a bruteforce script that will check all PIN codes from 0000 to 9999 later (you can see the result with ‘cat bruteforce.sh’
```
./brutforce.sh | nc localhost 30002 | grep -v "Wrong"
```
This command first executes a bash script named bruteforce.sh, then sends its output to localhost on port 30002, processes the result using the grep command, and outputs the lines that do not contain the string “Wrong“.
## Level 25 → Level 26
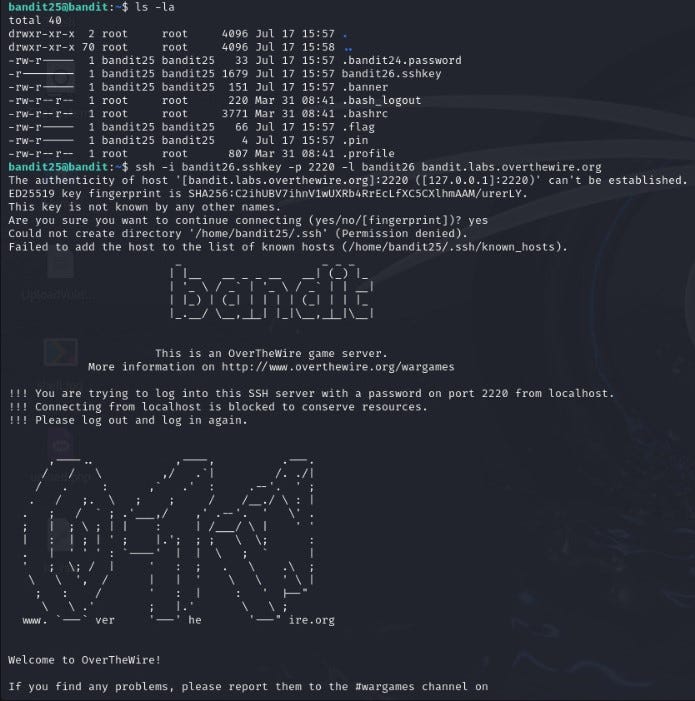
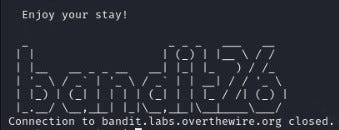
In this level, it is mentioned that bandit26’s shell is not `/bin/bash`, and you need to find out which shell it is and how to exit from it. First, connect to bandit25. Then, you will see `bandit26.sshkey`. When trying to connect to bandit26 with this SSH key, you encounter two scenarios: initially, you connect successfully (1), but then you are logged out (2).
1
2
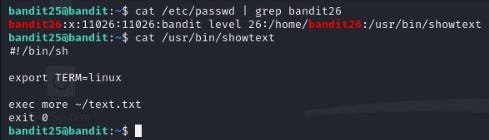
Later, when we read the contents of /etc/passwd to determine which shell bandit26 is using, we encounter the following result:
```
#!/bin/bash
export TERM=linux
exec more ~/text.txt
exit 0
```
* `#!/bin/bash`: Specifies that the script should be interpreted using the Bash shell.
* `export TERM=linux`: Sets the environment variable `TERM` to `linux`, indicating the terminal type supports basic ANSI escape sequences.
* `exec more ~/text.txt`: Executes the `more` command to display the contents of `~/text.txt`. The `exec` command replaces the shell process with `more`, making the script terminate after `more` finishes.
* `exit 0`: Explicitly exits the script with a status code of `0`, indicating successful completion.
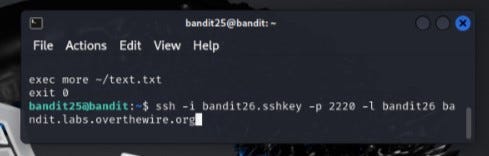
We connect via SSH using the key file ‘bandit26.sshkey’ on port 2220 with the username ‘bandit26’ to ‘bandit.labs.overthewire.org’ and aim to minimize the terminal to the maximum extent possible.
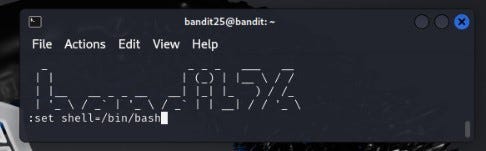
After connecting with SSH, we press the ‘v’ key to open the Vim editor, and then we enter the command “: set shell=/bin/bash” to set the shell to /bin/bash.
Then we open the /bin/bash shell that we specified earlier by using the command “:shell” and get password for bandit26
## Level 26 → Level 27
After connecting to bandit26, we use the `ls` command to view the files. Here, we notice the `bandit27-do` file. Running the command `file bandit27-do` reveals that the file is executable. When we execute it with `whoami`, we see that the owner is bandit27 (SUİD).
After that, by executing the file with its owner’s permissions (SUİD), we can obtain the password.
## Level 27 → Level 28
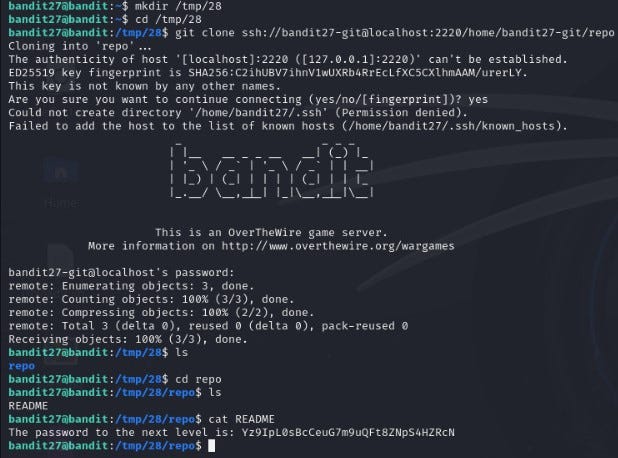
There is a git repository at `ssh://bandit27-git@localhost/home/bandit27-git/repo` via the port `2220`. The password for the user `bandit27-git` is the same as for the user `bandit27`. Clone the repository and find the password for the next level. Here, we need to use the `git clone` command and specify the port after localhost:
## Level 28 → Level 29
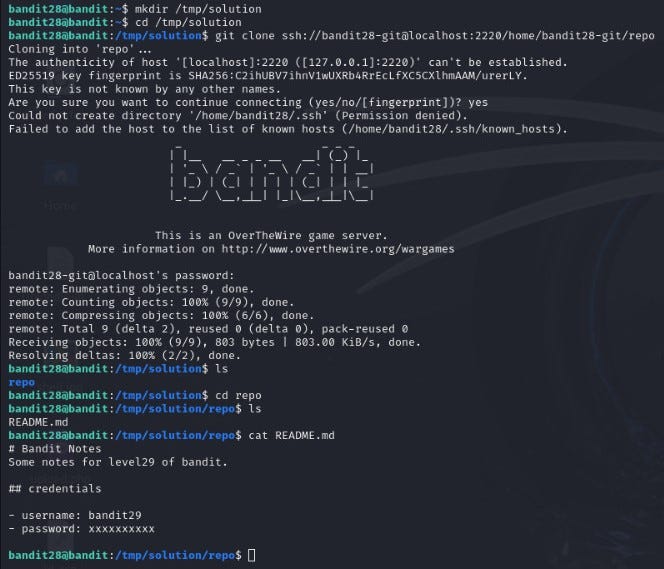
We download the GitHub repository here just like in the previous level. Later, we see that the password is in the form of \*\*\*\*\*\*\*\*\*\* in the README.md file.
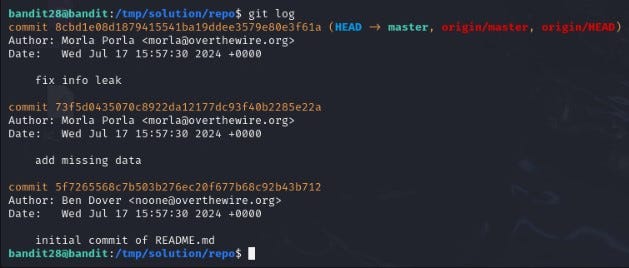
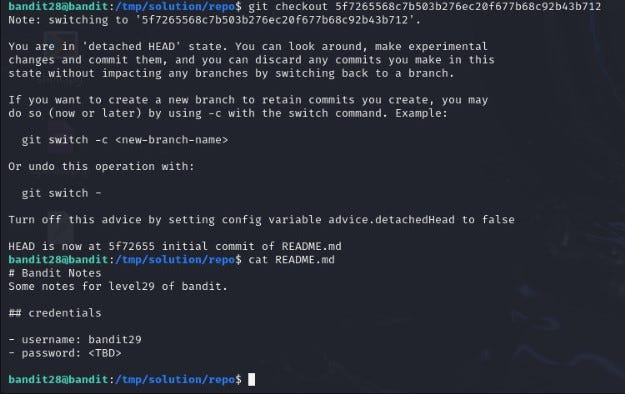
In the Git system, we see the commit history in the repository through the `git log` command. This command shows all commits from the latest to the earliest. Those highlighted in yellow are commit IDs. Detailed [**link**](https://git-scm.com/docs/git-log).
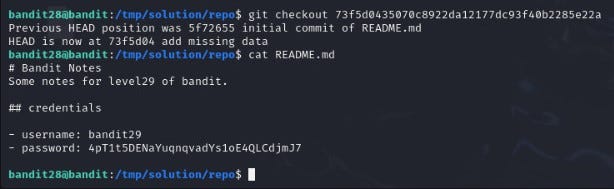
Using `git checkout `command, we can switch to a previous commit. To retrieve the password, it is sufficient to revert back to 2 commit IDs. Detailed [**link**](https://git-scm.com/docs/git-checkout).
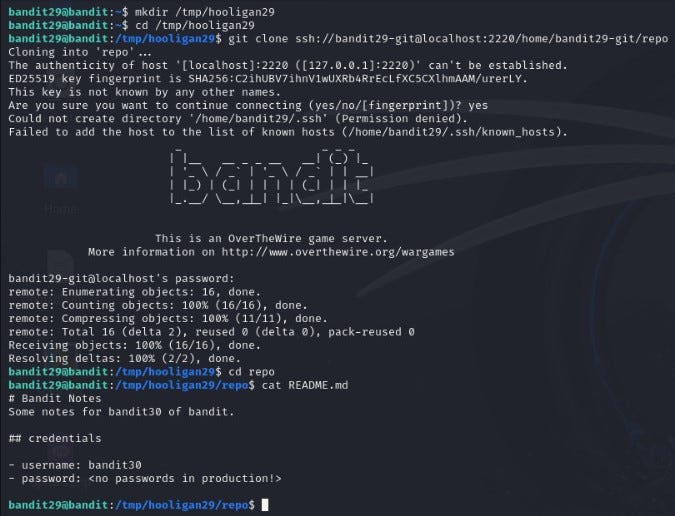
## Level 29 → Level 30
We download the GitHub repository here just like in the previous level. Later, we see that the password as ***\*** in the README.md file.
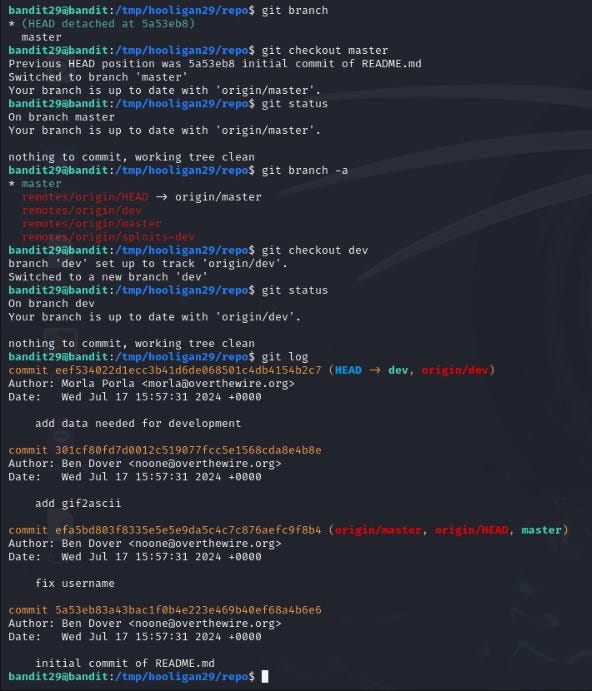
This didn’t work…
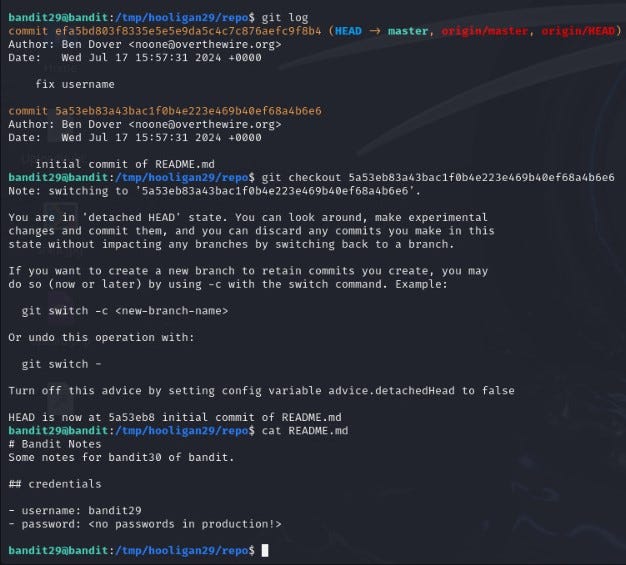
Later on, we use the [`git branch`](https://git-scm.com/docs/git-branch)command to see other branches. Then we switch branches using the [`git checkout`](https://git-scm.com/docs/git-checkout) `master`command. [`git status`](https://git-scm.com/docs/git-status)shows the current branch. `git branch -a` shows local and remote branches.
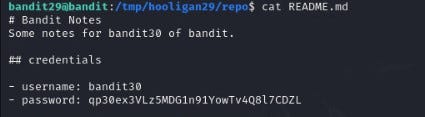
After changing our branch, we can read password:
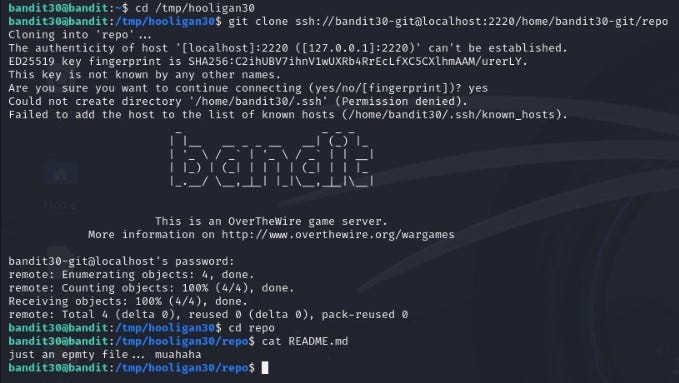
## Level 30 → Level 31
We download the GitHub repository here just like in the previous level. Later, we see that the password as “just an empty file…muahaha***”*** in the README.md file.
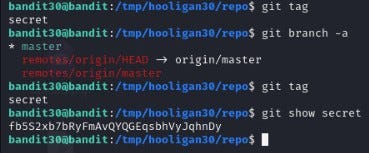
First, we check the previous methods, but we can’t find any logs or remote branches. Then we search for tags with[`git tag`](https://git-scm.com/book/en/v2/Git-Basics-Tagging) command, it shows us there is secret tag attached to our commit. We read it with the help of [`git show`](https://git-scm.com/docs/git-show) :
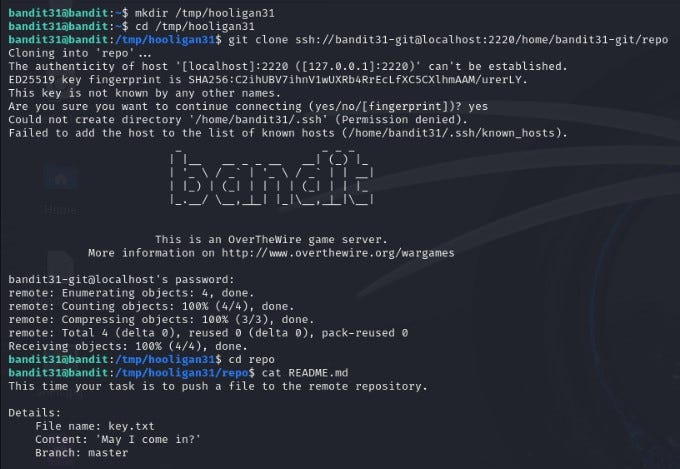
## Level 31 → Level 32
We download the GitHub repository here just like in the previous level. In README.md fiel we see that there is key.txt file and its content:
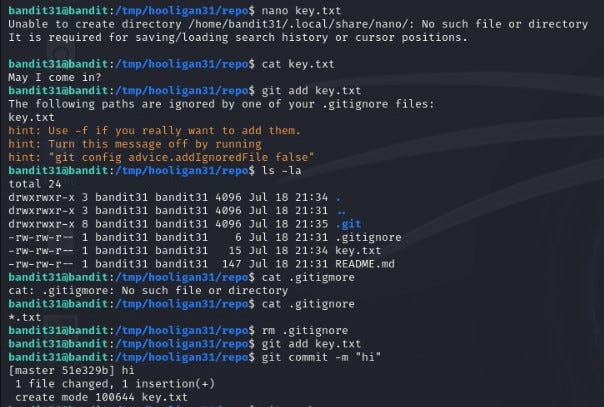
We add key.txt file manually. Then add this with `git add`command, but it gives us error that ***.gitignore*** file blocks this txt file. Then we read ***.gitignore*** file and see that it blocks all txt files. We remove ***.gitignore*** and again add key.txt:
After all we send it with `git push`command and get our flag:
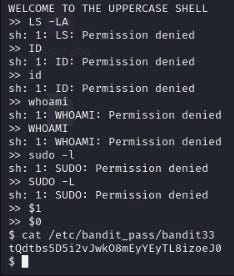
## Level 32 → Level 33
In this level, we are greeted by UPPERCASE SHELL. Initially, I executed several commands here, but all of them were blocked. Later on, the shell was opened through the $0 command. You can obtain detailed information about $0 from the [**link**](https://unix.stackexchange.com/questions/280454/what-is-the-meaning-of-0-in-the-bash-shell).
---
# Agent Instructions: Querying This Documentation
If you need additional information that is not directly available in this page, you can query the documentation dynamically by asking a question.
Perform an HTTP GET request on the current page URL with the `ask` query parameter:
```
GET https://foothold.gitbook.io/blog/overthewire-bandit/walkthrough-level-0-to-34.md?ask=
```
The question should be specific, self-contained, and written in natural language.
The response will contain a direct answer to the question and relevant excerpts and sources from the documentation.
Use this mechanism when the answer is not explicitly present in the current page, you need clarification or additional context, or you want to retrieve related documentation sections.